17000 (Maker Edge Pro) - CO2 Laser Low Output Checklist
Overview
Having to continually reduce speed and increase power can indicate low output from the laser. This document will help identify a low output laser tube on a 17000 Maker, Edge, or Pro machine.
There is a PDF version of this document on the right.
Required Tools
- Anodized Aluminum
- Alignment Target
- Phillips Head Screwdriver
- 5/32" Hex Wrench
- 3/32” Hex Wrench
- Masking Tape
Checklist
- Optics
- Alignment
- Focus
Reference Engraving
Download the sample file below.
Open the file and send it to the Epilog Dashboard.
Import the anodized aluminum setting from the materials library.
Send the file to the laser.
Load a piece of 0.025” thick anodized aluminum in the top left corner of the machine.
Set the table height with the manual focus gauge and record the CO2 focus value located on the lasers display.
Close all doors and panels.
Run the job, and save the engraving for reference throughout this procedure.
Label the engraving to help keep track of your progress.
Note: If your CO2 Focus value is above 0.04” or below 0.01” skip to the Verify Focus section of this document.
Checking Carriage Optics
Detailed instructions for these steps can be found at the links below.
Note: Optics should be clean and free of debris. Discolored or damaged optics should be replaced.
Remove the lens assembly. Clean both sides of the lens and check for damage.
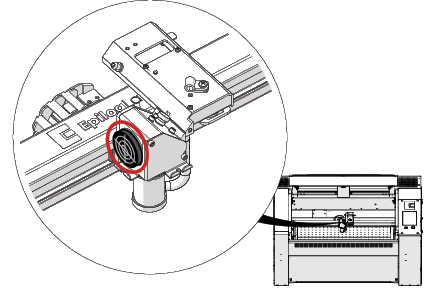
Remove the carriage mirror. Clean and check for damage.
Reinstall the mirror and lens.
Run the Reference Engraving job again. Pick a new unused area of the anodized aluminum to do the second engraving.
Compare the engraving from this section to the initial engraving.
Improvement:
- Low Output has been resolved.
- Follow the optics cleaning procedure below.
- After the full optics cleaning, repeat test engraving.
No Improvement:
- Proceed to the next section.
Verify Alignment
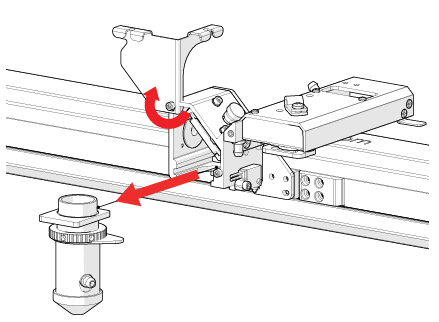
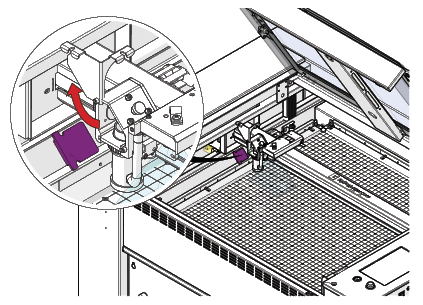
Install the alignment target into the carriage head.
Jog the carriage to Top Left (home position). Turn on the red dot pointer. Verify the red dot is within the center ring of the target.
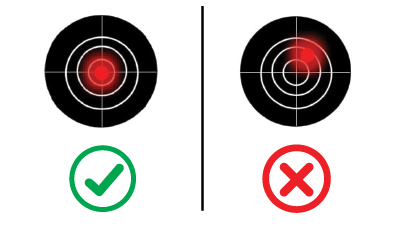
Jog the carriage to the bottom right. Verify the red dot is within the center ring the target.
Place a piece of masking tape over the alignment target.
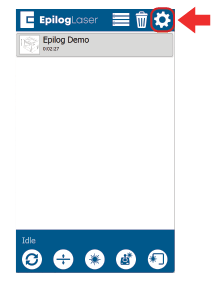
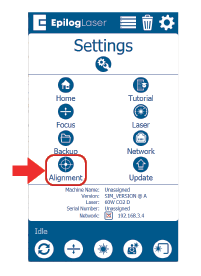
Click the gear icon in the top right of the display.
Select Alignment.
Ensure all doors and panels are closed. If the interlocked doors are not closed the laser will not fire.
Note: The carriage should be in the bottom right corner for Step 8.
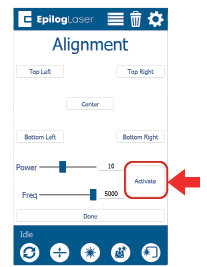
Warning: Be careful not to burn through the target. Check the target frequently. Remove the target when finished.
Get a burn mark by tapping the Activate button and watching for a burn mark on the tape.
Note: If the red dot, and burn mark do not match, follow this link to the full Alignment Procedure.
Improvement:
- If you’ve made adjustments to the alignment, run the test engraving.
- Compare the engravings.
- Low Output has been resolved.
No Improvement:
- Proceed to the next section.
Verify Focus
The goal of this section is to verify the focal distance is set properly. This is done by running a job and adjusting the table to find the brightest mark. There are specific steps for single source and dual source machines.
Send the Reference Engraving file to the machine with the anodized aluminum settings.
Load a piece of anodized aluminum into the machine.
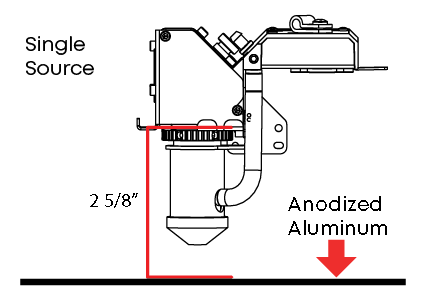
For Single Source Machines (CO2 Only):
Adjust the table untill the material measures 2 5/8” (66mm) from the focus gauge bracket.
Close all doors and panels.
Run the job.
While the job is running, raise and lower the table, looking for the brightest mark.
For Dual Source Machines (CO2 and Fiber):
Run the job.
Once job is in progress, pause the job.
Adjust the table untill the material measures 2 7/8” (73mm) from the focus gauge bracket.
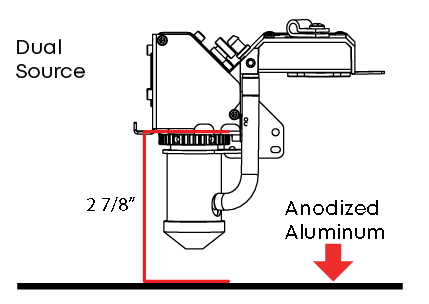
Close all doors and panels.
Resume the job
While the job is running, raise and lower the table, looking for the brightest mark.
For Single and Dual Source Machine:
Record the CO2 focus value. Compare this value to the initial value recorded in Step 6 of the Reference Engraving section.

Run the Reference Engraving file again with the new CO2 Focus Value.
Compare this sample to the original.
Improvement:
- Low Output has been resolved.
- Follow the full focus procedure.
- Low Output has been resolved.
No Improvement:
- If the alignment or optics procedures were skipped, complete those.
- Possible low output from tube.
- Contact Epilog Tech Support.
Conclusion
If you are still experiencing low output after the alignment, focus, and optics cleaning procedures, please reach out to Epilog Laser Technical Support. Please include pictures of the test engravings, red dot pointer, burn mark, and recorded focus values.
Checklist
- Optics
- Alignment
- Focus
Related Articles
17000 (Maker Edge Pro) - CO2 Laser Alignment
Introduction In this article we’ll walk you through aligning the laser on the Epilog Fusion Edge & Fusion Pro. During this procedure, all persons present in the room must be equipped with eye protection, such as safety glasses, eyeglasses or goggles. ...17000 (Maker Edge Pro) - CO2 Laser No Outuput Checklist
This document is designed to help determine if you need to replace your laser tube. Overview These items should be checked before replacing a CO2 laser tube with no output. If the laser has been inactive for more than one (1) month, follow the ...Epilog Fusion Maker 36 & Edge 36 – Pre-Install Checklist
Before scheduling installation or training for your Epilog Fusion Maker 36 or Epilog Fusion Edge 36 laser system, please verify that all utilities, workstation setup, and site conditions meet the requirements listed below. ✅ Power Requirements Fusion ...17000 (Maker Edge Pro) - Testing Motors During Startup
This article outlines the steps for testing the motors during the startup sequence of the Epilog Fusion 17000 (Maker Edge Pro) Laser system. Pre-Startup Manual Positioning Before powering on the machine, manually move the components to the center of ...17000 (Maker Edge Pro) - X-Axis Belt Tensioning Guide
Instructions on tensioning the X-Axis belt on a 17000 Edge, Maker, Pro, or 16000 Pro 48 200 Watt. Overview This document and video provide instructions on utilizing the X-Axis belt tensioning tool. The tool assesses the belt's tightness, allowing us ...