17000 (Maker Edge Pro) - CO2 Laser No Outuput Checklist
Overview
These items should be checked before replacing a CO2 laser tube with no output. If the laser has been inactive for more than one (1) month, follow the Extended Cold Start Guide first. The goal of this document is to determine the operational status of the CO2 laser in a Fusion Edge, Maker, or Pro machine.
There is a PDF version of this document on the right.
Required Tools
- Heavy Card Stock
- Phillips Head Screwdriver
- 5/32" Hex Wrench
- Masking Tape
Checklist
- Interlocks
- Laser Control LEDs
- Burn Mark From X-Axis
- Optics
- Alignment
- Focus
- LEDs On Laser Tube
- Burn From Source
Safety Interlocks
Locate the safety interlock LEDs on the right-side of the display panel.
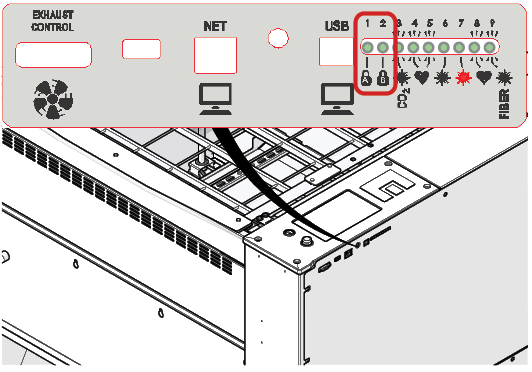
The two interlock LEDs are labeled with lock icons. These LEDs must be illuminated when the doors are closed.

While running a job, the interlock LEDs should stay illuminated the entire time.
No Interlock LEDs
- Check for debris around top door seal.
- Make sure all doors are closed.
- Look for an unusual gap between the top door and chassis.
Note: If the interlock LEDs are not functioning properly, you must troubleshoot them before proceeding.
Laser Control LED
Locate the laser control LED on the right-side of the display panel. It’s labeled with a CO2 Icon.
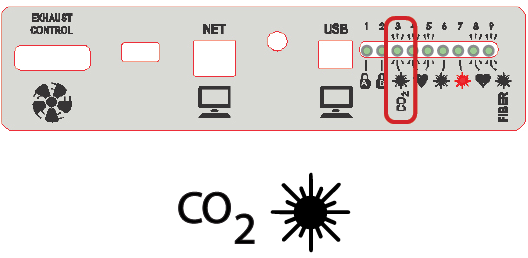
Note: The laser control LED will illuminate when the system is commanding the laser to fire.
Clear the laser bed of all flammable material.
Download the sample vector job below.
Send the job to the laser, and run the job.
The CO2 laser LED should be on while the job is running.
No Laser Control LED:
- Check artwork / job parameters.
- Make sure the laser source is set to CO2 if you have a dual source machine.
- Verify the power is set properly.
- Check that the artwork is positioned properly within the artboard.
Note: If the laser control or interlock LEDs are not functioning properly, you must troubleshoot them before proceeding.
Check output from X-Axis
Place masking tape over the circular opening on the left side of the X-Axis rail.
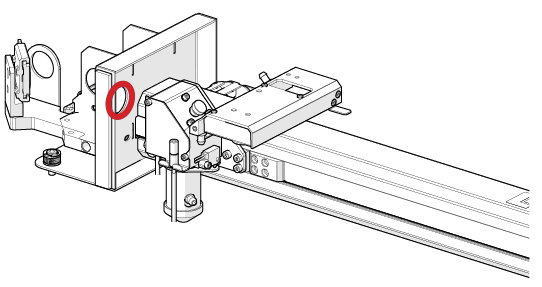
Move the carriage to the home position (top left) by pressing reset twice.
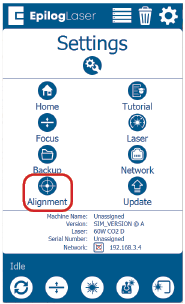
Click the gear icon in the top right of the display.
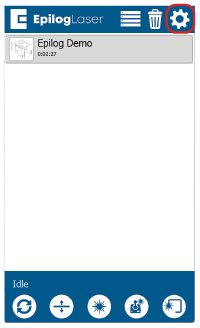
Select Alignment.
Get a burn mark by tapping the Activate button and watching for a burn mark on the tape.
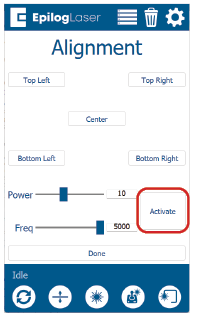
Check the tape for a burn mark.
Burn Mark:
- Check carriage optics (lens / mirror).
- Refer to the Low Output Procedure.
No Burn Mark:
- Proceed to the next section.
Check laser Status LEDs
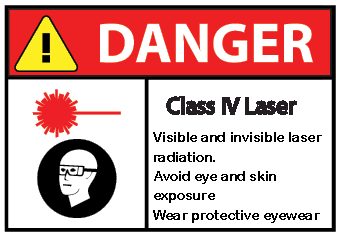
WARNING! Laser Safety Statement: Before proceeding, EVERYONE must be wearing safety glasses for the following steps.
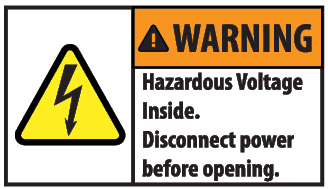
HIGH VOLTAGE SAFETY STATEMENT: In the following steps, High Voltage will be identified with this icon. DO NOT TOUCH the areas marked with the high voltage icon.
Turn off the machine and disconnect the power cable.
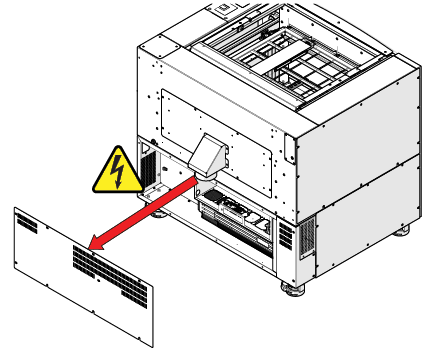
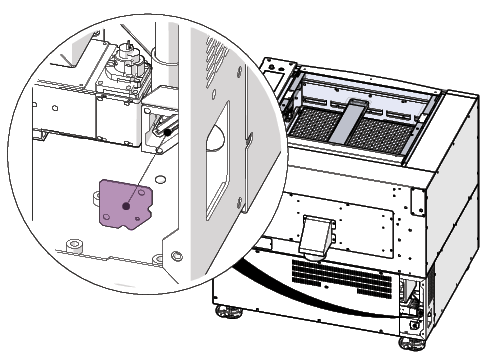
Remove the back panel of the machine.
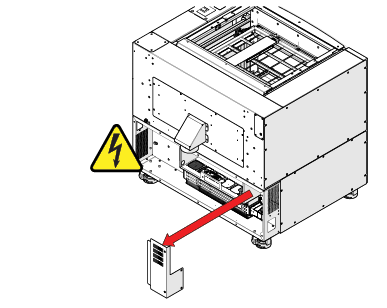
Remove the mirror 1 cover located at the bottom left corner of the machine.
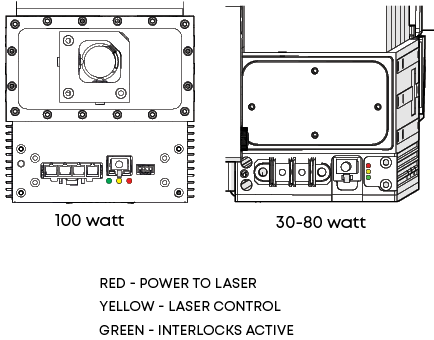
There are three LED’s on the end of the laser tube. The red LED indicates there is power to the laser. The green LED indicates the interlocks are active. The yellow LED will only come on when the laser is commanded to fire.

Reconnect the power cable.
Power the machine ON.
Close all doors.
Check that the red and green LEDs are illuminated on the side of the laser tube.
No Red LED:
- Laser tube unplugged.
- Damaged harnessing to laser.
- Damaged laser tube.
- Damaged power supply.
No Green LED:
- Interlocks are NOT engaged.
- Damaged Interlock harnessing.
- Damaged Interlocks.
Note: If the interlock LEDs on laser do not match the interlock LEDs on the side of the control panel, troubleshoot the connection between the laser and control board.
Check Laser Output
Warning: In this step we will test fire the laser with a piece of material directly outside the tube. EVERYONE must wear safety glasses for this step.
Remove the magnetic cover over mirror 1.
Remove mirror 1.
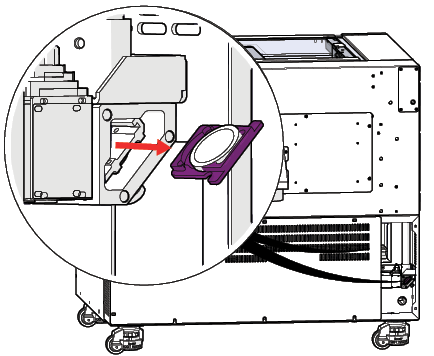
Place a piece of card stock in the mirror 1 housing.
Fire the laser In Alignment mode.
Remove the material from the mirror housing and check for a burn mark.
Tap the Activate button in alignment mode and check that the yellow CO2 laser LED on the laser tube illuminates while the Activate button is being pressed.
Note: You may need two people for this step. One to watch the LEDs on the laser tube while the other operates the machine. You can also take a video of the lights.
Conclusion
No Burn Mark:
- If you are not getting a burn mark directly outside the laser tube, and all three LEDs on the laser are working properly, contact Epilog Technical Support.
Burn Mark:
- If you are getting a burn mark directly outside the tube but not on the bed of the laser, follow the Low Output laser replacement checklist.
Checklist
- Interlocks
- Laser Control LEDs
- Burn Mark From X-Axis
- Optics
- Alignment
- Focus
- LEDs On Laser Tube
- Burn From Source
Related Articles
17000 (Maker Edge Pro) - CO2 Laser Alignment
Introduction In this article we’ll walk you through aligning the laser on the Epilog Fusion Edge & Fusion Pro. During this procedure, all persons present in the room must be equipped with eye protection, such as safety glasses, eyeglasses or goggles. ...17000 (Maker Edge Pro) - CO2 Laser Low Output Checklist
Overview Having to continually reduce speed and increase power can indicate low output from the laser. This document will help identify a low output laser tube on a 17000 Maker, Edge, or Pro machine. There is a PDF version of this document on the ...Epilog Fusion Maker 36 & Edge 36 – Pre-Install Checklist
Before scheduling installation or training for your Epilog Fusion Maker 36 or Epilog Fusion Edge 36 laser system, please verify that all utilities, workstation setup, and site conditions meet the requirements listed below. ✅ Power Requirements Fusion ...17000 (Maker Edge Pro) - Testing Motors During Startup
This article outlines the steps for testing the motors during the startup sequence of the Epilog Fusion 17000 (Maker Edge Pro) Laser system. Pre-Startup Manual Positioning Before powering on the machine, manually move the components to the center of ...17000 (Maker Edge Pro) - Updating the Firmware
Firmware update procedure for the Fusion Maker, Edge, Pro, and Galvo. Find the newest version of the firmware for your engraver by clicking HERE. Overview In firmware version 1.0.9.0, the update process has been streamlined. For systems operating on ...